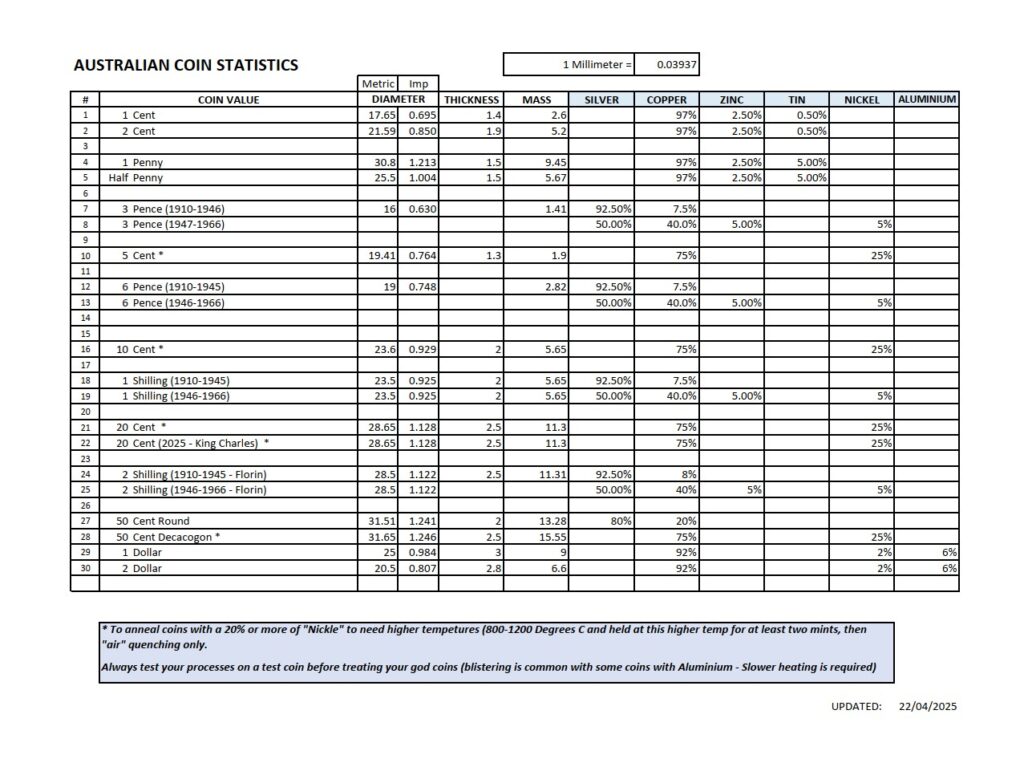
1. The Fundamentals of Ring Crafting
 There are a couple of fundamental methodologies you might employ in your journey as a coin ring crafter. The tools required for each method are different.
At the most basic level all you need is a way to make a hole in the selected coin, a ring mandrel and raw hide mallet and a lot of time and patience. The methodology is simple. A) Make a hole, B) Fit the coin to the mandrel and start working the coin with the mallet. You fold the coin over and stretch it to the right size as you go. C) Sandpaper and file the rough edges smooth. D) Polish the ring with metal polish and polishing clothes. It’s quite simple but a technique that requires patience & even a greater level of practice.
Mechanically folding the coin to a band and then cold forging the ring to the correct size. And again, you bring your ring to life with polishing and adding patina and more polishing. With this method you preserve much of the coins original embossing and commonly you often seek to enhance this embossing through metal bluing to highlight and add depth.
This is the level most first-time crafter’s begin, and it is here where many abandon their ring attempts. The most common cause of ring failure is not achieving a perfectly centered hole in the coin. A variation of milometer or less of eccentricity can be the source of many problems. Yes, the very first step. This is why I encourage all who want to venture into this craft spend a bit more on the basic ring forming tools and with a reasonable level of practice your will soon have a wearable ring. Below is a list that unashamedly follows this approach. Yes, they are the tools I sell and use. I got tired of wasting time correcting errors and not having a ring that I was proud of and wanted to wear. These are the basic tools indispensable for coin ring making:
2. Coin Selection
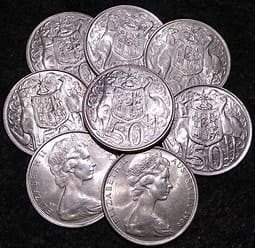
Before diving into the tools, it is crucial to choose the right coin. Consider its size, metal composition, and design, as these factors will affect the final appearance of the ring. Popular Australian choices include the pre-1946 silver coins, (Threepence, Sixpence, One Shilling, Florin and the 1966 round Fifty cent coin and all these coins have a high silver content (the higher the silver content the more malleable the coin). You can also work the copper coins the penny, half penny and the One & two Dollar coils (Copper based coins need to be sealed otherwise the wearer will have stained fingers

3. Hole Punch
To begin the transformation, you’ll need a hole punch to remove the coin’s centre. This tool can be manual (copper mallet) or hydraulically driven; Auto centering punch ensures a clean, precise cut or you can use an actual drill bit. Punch sizes vary, so select one that matches the desired size of your ring.
While this step may seem quite benign however if the hole is not perfectly centered will reap havoc with your rings.
- Average – Punch and die set
- Better – Jason Works Basic Auto Centring Punch with a single punch and die
- Good – Jason Works Starter kit
- Better – Basic Auto Centering Punch with a single punch and die
- Best – Jason Works Master Deluxe Auto Centering Punch (9 punches 3/8 to 3/4”)
4. Ring Mandrels Plus
A ring mandrels are essential for shaping the coin into a ring and to size a ring. a) A tapered harden steel cylindrical bar. b) Both tool marked with ring sizes. c) De-burring tool & range of sand-papers.

5. Doming Block or Reduction Dies
The doming block and ball bearing can be used to start the folding process to form a ring. Depending on your hole size a corresponding Ball bearing is used. This is a hardened steel block with various dome-shaped indentations and corresponding ball bearings.
An alternate tool is a reduction Die (Various sizes) and is matched to the coin size, plus a set of folding cones (See Coin Table –Note the Die is slightly .larger than the coin).
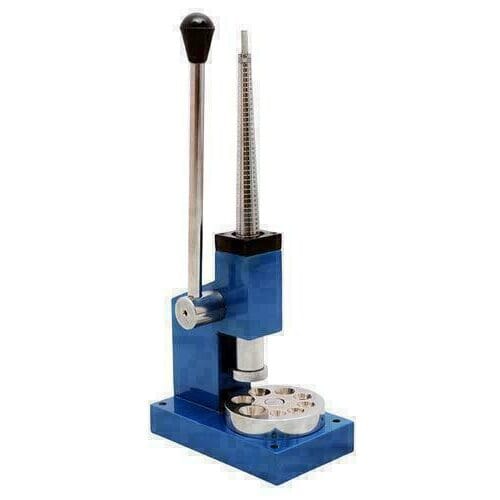
The final tool needed to complete the step is an Arbor Press (1- 2 ton) or a hydraulic press will complete the task (See Tip on Hydraulic Presses) .
6. Ring Stretcher/Reducer
 A ring stretcher/reducer is a versatile tool for resizing the ring. It helps expand or contract the ring to ensure a perfect fit. Manual and hydraulic models are available, providing varying levels of precision and ease of use.
A ring stretcher is not inexpensive tool but allows great versatility. Some ring stretchers have a two-sided reduction wheel (17° and 25° Dies). The ring stretcher can be used as an Arbor press if used in conjunction with a series of folding cones (We sell the PepeTools Ring Stretcher (6 Splines & Comes with a Nylon Wheel as well) and it is one of the best value products. The Durston has a wider throat for when you are using it as an arbor press).
7. Rawhide Mallet
A rawhide mallet is used for gentle shaping and forming without damaging the coin. Its soft yet sturdy material ensures that the coin retains its intricate details while being worked into a ring.
8. A Propane Torch or a Strong Heating System for Annealing
 As you work the coin it hardens and loses its malleability. The coin will even crack if you apply sufficient force. Annealing is a process by which non-ferrous metals can be softened and return its malleability. A propane silver soldering kits can be a good solution (Propane produces a hotter flame over Butane. Butane torches are often cheaper but will take longer (Gasweld it an Australia wide tool distributor and they have some well priced kits in the bracket. If you are desperate generally stock torches, but it is wise to check the prices) .
9. Polishing Wheels and Compounds
Polishing is the final step to give the ring a smooth, shiny finish. A set of polishing wheels and compounds will help achieve this. Start with coarse compounds to remove imperfections and gradually move to finer compounds for a mirror-like finish (There are many power tools available in this category e.g. Dremel. But beware, with power tools you can make powerful mistakes also) .
10. Miscellaneous Tools
To pickle or not (See separate post)? A pickle bath is an excellent non aggressive way of cleaning coin rings. A cordless drill can often be used as a polishing wheel. Sizing tools – Ring sizes.
11. Patience and Practice
While not a physical tool, patience and practice are crucial for mastering coin ring making. The process requires precision and attention to detail, and each step builds on the previous one. With time and dedication, you will refine your skills and create stunning rings.
Conclusion
Coin ring making is a rewarding craft that combines artistry and technical skill. By equipping yourself with the basic tools and a willingness to practice, you can transform ordinary coins into extraordinary pieces of wearable art. Embrace the journey, and enjoy the creative process that coin ring making offers.
Copyright – Coin Ring Tools Australia 2025.